Last summer I felt the urge to start a sketchbook as a quiet, mindful activity that would engage my creative side and I found that I was particularly keen to capture places I visited. I enjoy taking photographs when I’m out and about, and I thought they’d translate well into sketchbook form too. And I’m loving it because not only am I capturing memories whilst also being creative, but it’s also very low pressure because it’s just a sketchbook! There’s something very freeing about it, just like journaling. If this hobby appeals to you, here are my beginner’s top tips for getting started with a travel sketchbook:
This post contains affiliate links.


1. Follow Sketchbook Artists Who Inspire You
There are a few artists I follow on Instagram whose travel-based sketchbook pages really inspire me. I save their posts as inspiration for when I’m not feeling it. And if you need the extra push, a lot of them run drawing sessions on Patreon, or they’ll post a list of prompts to get you started. Here are some of my favourites as a starting point.
2. Find The Style & Materials That Suit You
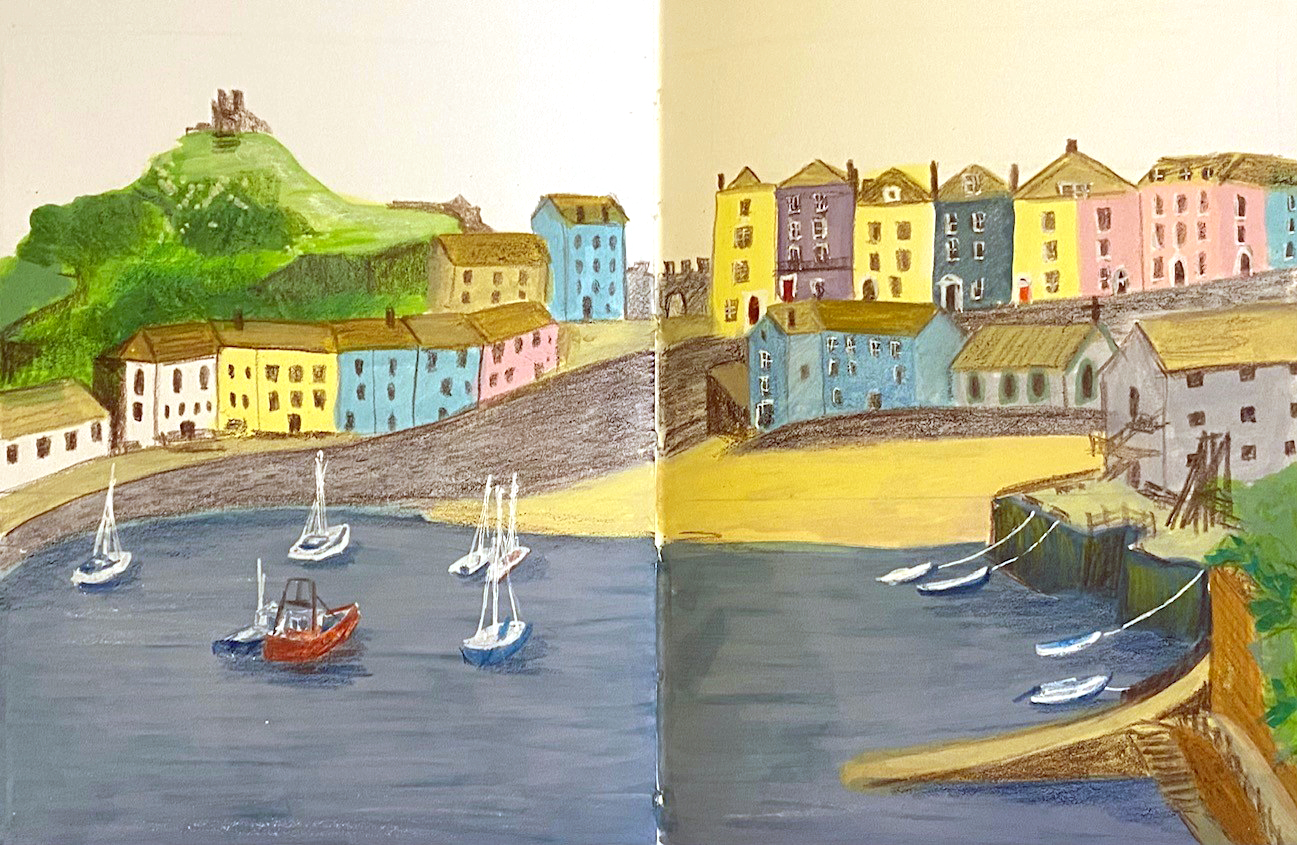
From the beginning I knew I wanted to use colour and wasn’t interested in pencil drawings. I started out using coloured pencils, and then I trialled some alcohol based markers, but I wasn’t happy with any of my pages. Then I bought some acrylic paint markers and something just clicked! I love being able to block out colour areas and then work on top with pencil crayon for a mixed media approach. It just works well for me. If you don’t know where to start, try experimenting with different materials until you find something you like, or browse some different sketchbook artists for inspiration.

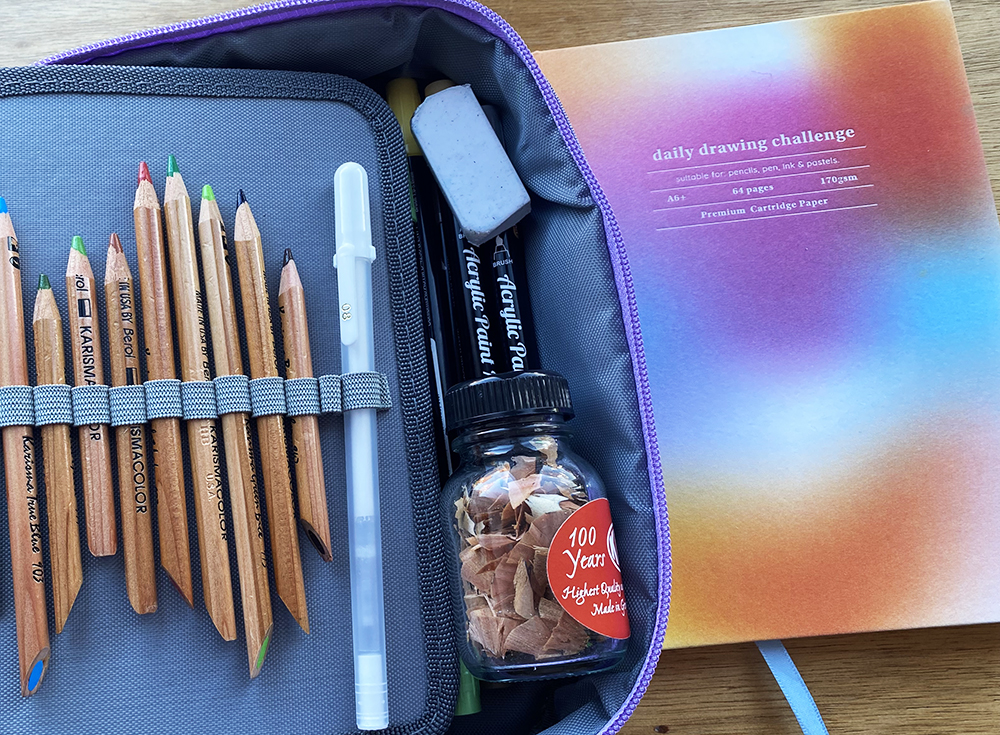
My current portable little kit includes:
- Sketchbook. This small daily sketchbook fits perfectly in my kit, so it’s great for now. It does have a 4-way divide on every spread, as it’s supposed to be a drawing a day challenge. However I no longer use it like that, and sometimes draw across the whole spread if I want something to be bigger. Here’s a similar sketchbook if you like the idea of this size.
- Acrylic Paint Markers. I’m enjoying having the coverage of paint without the time, effort and mess required to use actual paint. These markers are great for carrying about too. Buy ShuttleTip Dual Tip Acrylic Paint Pens here.
- Coloured Pencils. I’ve had my Karisma pencil crayons for such a long time that they’re no longer available to buy, which is a shame because the quality is great and I’d definitely have recommended them! But there are plenty of decent quality pencils out there, and they’re a great staple for mixed media sketchbooking.
- Handy Travel Sized Case. My cute lilac pencil case is the perfect size for all my markers, a selection of coloured pencils, and it also fits my sketchbook inside! You can by this pencil case here.
- Sharpener. It’s really handy to have a sharpener that collects the shavings for when you’re on the go.
- White Gel Pen. This Gelly Roll Basics White Pen is great for adding a few highlights here and there.

3. Just Get Started; Don’t Overthink It!
The best way to think of a sketchbook is that there’s no pressure to create masterpieces, it’s just about trying things out and developing your style. If you don’t like what you draw, you can turn the page and try again, or start something completely new. Nobody has to see the pages you don’t like. But it’s nice to look back on them and see where you started.
Before I got started I actually did a couple of mini courses on Domestika by artists I like, and this was a great way to get motivated. I’d definitely recommend these for beginners:
- Sketchbook Exercises for Artistic Growth by Sarah van Dongen
- Travel Sketchbook Illustration with Gouache by Jessica Smith
4. Draw What You Want To Draw
I struggle to be inspired to draw portraits of people or detailed close ups of objects, but I love capturing a scene, especially in a loose/free style. I also enjoy picking a smaller area of a scene, such as one store front, a shelf of flowers or a meal I ate. And I have also enjoyed filling a spread with lots of mini sketches on a theme, such as plants or groceries, just for something different. It’s up to you what you draw, because if you aren’t enjoying it, you will struggle to keep going.


5. Use Reference Photos
I don’t often draw from life as I like to take my time and don’t always complete something in one sitting. So I use reference photos, and these could be ones I took myself or ones I find online when searching for the places I want to draw. Sometimes I just didn’t take a good enough picture and that’s fine! I can find the exact view or scene I want to sketch via Google. I have even used Google street view on one occasion!

And finally…
6. Keep It Up!
The more you fill your sketchbook, the more you’ll improve, understand what motivates you, discover what pages you are happy with, and it will get easier and easier to create something.

One thought on “Travel Sketchbook Inspiration and Tips for Beginners”